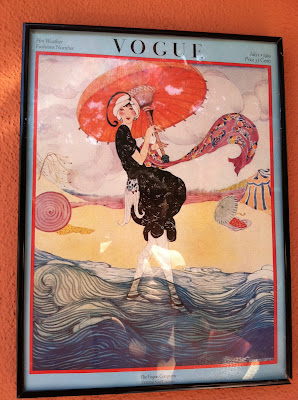
Taking inspiration from the fresh paint job that was just done to my building I immediately hit up my second hand hot spots to re-vamp my space. To my luck I found the perfect starting point for texture, color and theme in this vintage July 1st, 1919 VOGUE print titled none other than “HOT WEATHER FASHIONS”...
As if too good to be true, I turned around the corner to find this slightly faded lliclla smoothly stretched and framed....the perfect compliment to my first find and an exact color match to the burnt orange that was used for the walls...how serendipitous!
Although I have been a little weary about letter wall art (thinking this was just too much of a decorating fad) I gave in when I found this “H” fabric covered hanging for only $1. It was not only in excellent condition but had just the right colors and textured print to offset the other pieces.
From there came the 24 hr brain crunch to figure out what word to contrive from this...And as I always do I scanned and scoped for the right fit...when the right word finally popped in my head I couldn't believe that it had actually been in front of me the whole time...right in the title of the vogue print and so was born “HOT”. And what else describes the word “HOT” than a thermometer, so I replaced the insides of this nifty $2 octagonal clock (conveniently my “O”) with an outdoor thermometer (easily found at your local hardware store for under $6!!).
The “T” in our HOT was not however found second hand but was purchased at Michael's for just another $2. Unfinished to begin with, it was hand painted and encrypted with a quote on summer by Ada Louise Huxtable.
And it all put together...
One detail not to be forgotten in of course was lighting...and the fact that there was none in this space until I made these colorful lampshades from cocktail umbrellas inspiration courtesy of the delicate umbrella being held in the Vogue print!
I used some lampshade frames I had picked up for $2 each a while ago that I had been hanging on to for a project like this to come along, went to Party City and purchased 2 boxes of jumbo cocktail umbrellas and got to gluing.
A how-to on this crafty little project can be found here on The Etsy Blog

And how could this retreat so close to our studio not be accessorize with some of the very products we make...100% organic kapok filled pillows with covers from re-purposed materials!
Finally came the grueling task of what to do with my floors and since I did not want to splurge on a an outdoor rug I painted one! Not only was I inspired by stripes already in other areas of this project but also by a
Tim Burton exhibit I recently went to at LACMA...
So enough of the details, I am sure you want to see how it all fits together!
This blue bench was constructed from 2 old storage cubes I have been lugging around since college. They were originally black but to add a pop of color and to to contrast the oranges I painted them blue. I bought a piece of wood, sanded and painted it to match, then laid it on top to create this sturdy additional seating and plant shelf area.
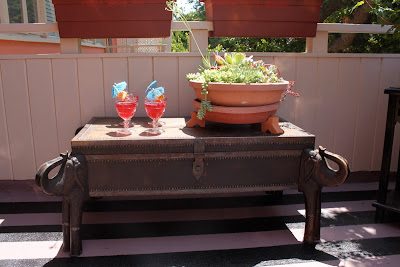
My obsessions with elephants continues...and I was stoked when I found this trunk while on an adventure to Ojai with my mother!
This outdoor space wouldn't be fit for entertaining guests or client without a few refreshments!!
Or a treat on the eye and the nose with some colorful and aromatic succulents and perennials!
The best part is how they attract beautiful fluttering butterflies and hummingbirds!
More details can be seen straight from the Re-Nest entry form where I had to describe my space, address my biggest design challenges, and give my tips for creating a great outdoor space...Heres what I had to say:
"This multi-purposed space starts the day for me with yoga and ends with me enjoying an evening cocktail with my husband. During my at home work days it also provides plenty of escape for getting some sun or taking a break to get those creative juices going again. Being only a block from the beach it stays bright but breezy, and feels like an oasis away from an oasis. And the best part? Everything was DIY right down to the pillows and furniture - all re-purposed from other materials. Very green!"
Biggest Design Challenge With This Space: Getting nice screening so we don't have to see our next door neighbors' empty porch while gaining some privacy at the same time. Our solution: very viney bougainvilleas. They grow like crazy, add more color and will eventually fill in completely!
Tips for Creating a Great Small Outdoor Space:
1. Find something of inspiration and go with it! For me it was a "Hot Weather Fashions" poster cover from a vintage issue of VOGUE. From there came the DIY cocktail umbrella lamp shades and the "HOT" thermometer I made from an old clock frame. The rest just fell into place!
2. Don't under estimate the impact of flooring and how it can make your space feel bigger or cozier. For us, we chose to to paint it with horizontal stripes to accent the other textures and fabrics, and to really make a bold statement.
3. Choose the right plants. Our space gets tons of sun so staying of top of watering is a must. But for the days we neglect, our plants still hold up because we chose drought-resistant succulents which still provide color. We've learned our lesson to go with colorful perennials instead of annuals that don't require a lot of work. Instead, they provide longer blooming times and less work which for us equals more time to enjoy our space.
4. My final tip and probably most important tip is to find your space's function and purpose. Whether it be for retreat, entertaining or both, figure out what is most important and play that part up.
Creatively Yours,
Cassandra Stearns


